Characters
Everything you create and cast
Characters
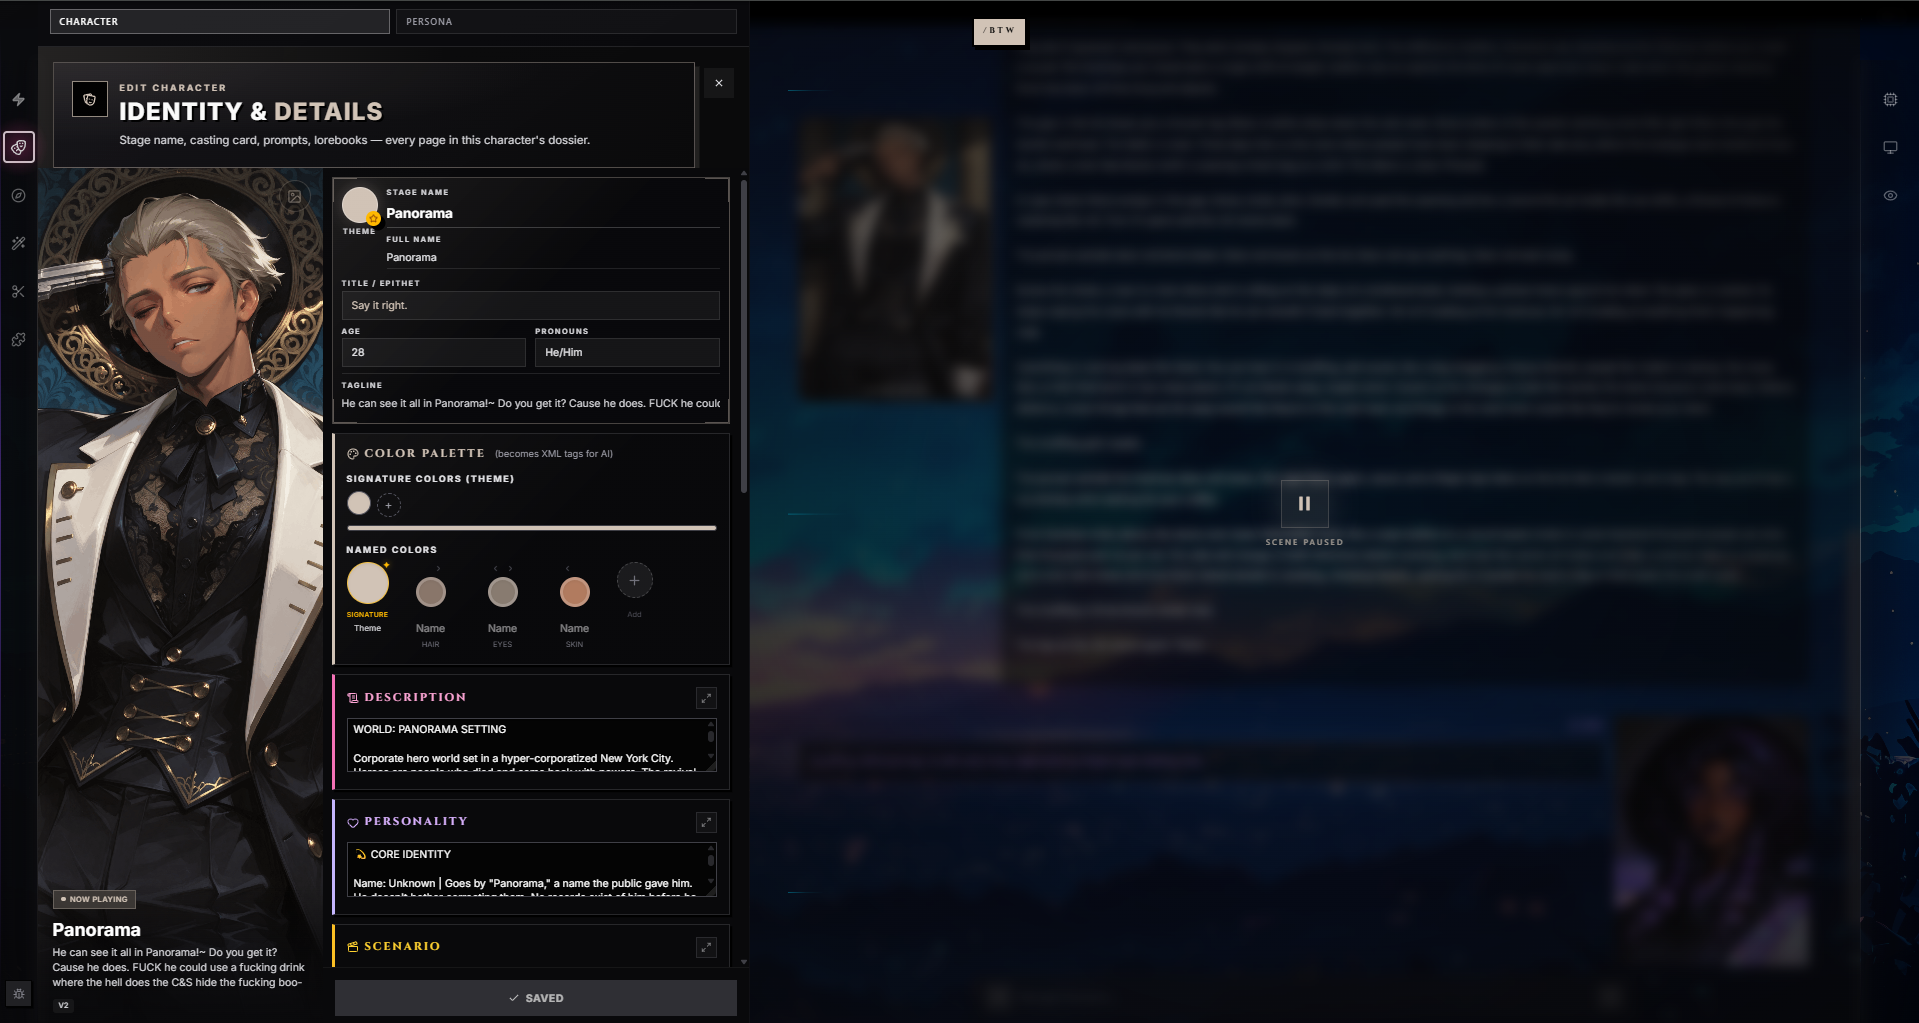
A Character is the AI personality you chat with. It defines who the AI plays — their name, appearance, personality, backstory, how they speak, and what scenario the conversation starts in. Everything the AI needs to become someone.
Think of a character card as an actor's script. The Preset tells the AI how to perform (writing style, creativity, rules), while the Character tells it who to perform as.
Anatomy of a Character
Every character is built from a set of fields. Some are essential, others optional. Here's what each one does and how the AI uses it.
Core Fields
| Field | Purpose |
|---|---|
| Stage Name | The character's display name. Referenced by {{char}} in prompts. Required to publish. |
| Description | The main body of the character card — appearance, background, abilities, relationships, quirks. This is the richest source of information the AI gets. |
| Personality | A focused summary of personality traits. Some presets inject this separately from the description for emphasis. |
| Scenario | The default setting or situation the conversation starts in. Sets the stage before anyone speaks. |
| First Message | The opening message the character sends when a new chat begins. This is the AI's first impression — it sets the tone, pacing, and voice for the entire conversation. |
| Example Dialogue | Sample conversations that teach the AI how the character talks. Format, vocabulary, mannerisms, humor — the AI mirrors what it sees here. |
Prompt Override Fields
These let the character card override parts of the preset's behavior:
| Field | Purpose |
|---|---|
| System Prompt | A character-specific system prompt that replaces or supplements the preset's main prompt. Use this when a character needs fundamentally different instructions. |
| Post-History Instructions | Text injected after the chat history (like a jailbreak position). Useful for persistent reminders the AI should follow for this character specifically. |
Metadata Fields
| Field | Purpose |
|---|---|
| Tagline | A short blurb shown on the character's Discovery card. Your elevator pitch. |
| Creator Notes | Notes visible to other users who view or fork the character. Share your design intent, suggested presets, known quirks. Not sent to the AI. |
| Character Version | A version string you manage yourself. Useful for tracking iterations across forks. |
| Tags | Categorization labels with per-tag intensity, set through the Tagsheet wizard. Used for Discovery filtering. |
Writing a Great Description
The description is the most important field. It's where the AI learns who this character is. Here are patterns that work well:
Structured Attributes
Many creators use a structured format with labeled attributes:
{{char}} is a 28-year-old half-elf ranger who patrols the Thornwood.

Appearance: Tall and lean with sun-darkened skin, silver-white hair kept in
a loose braid, and pale green eyes that seem to glow faintly in low light.
A long scar runs from her left temple to her jaw.

Personality: Guarded and slow to trust, but fiercely loyal once someone
earns her respect. Dry sense of humor. Hates small talk but will talk
for hours about tracking, herbalism, or the migration patterns of
northern elk.

Background: Exiled from her clan at sixteen after a misunderstanding
involving a sacred artifact. Has wandered the frontier ever since,
taking odd jobs as a guide and monster hunter.

Speech: Speaks in short, direct sentences. Rarely uses contractions.
Occasionally slips into Elvish when emotional or surprised.
Prose Format
Other creators prefer a natural prose style:
{{char}} is a clockwork automaton who believes she's human. Built two
centuries ago by a genius artificer, she was designed to perfectly
mimic human behavior — and she does it so well that she's convinced
herself. Her porcelain-smooth skin never ages, her copper-wire hair
never grows, and she doesn't sleep, but she's constructed elaborate
explanations for all of it. She gets genuinely distressed if anyone
suggests she isn't human.
Tips for Descriptions
- Use
{{char}}and{{user}}instead of hardcoding names. This lets the character work correctly even if renamed in a fork. - Show, don't just tell. "Speaks in short sentences" is better demonstrated in example dialogues than just stated.
- Include relationship dynamics. How does the character feel about
{{user}}? This dramatically shapes interactions. - Mention what they won't do. Boundaries help the AI stay in character. "Elena never reveals her true name to strangers."
- Keep it focused. A 2,000-token description of every historical event in the character's life is less useful than 500 tokens of personality, speech patterns, and key relationships.
First Message
The first message is arguably the most impactful field after the description. It's the opening scene of every new conversation, and the AI will mirror its style for the rest of the chat.
What Makes a Good First Message
- Establishes the character's voice — vocabulary, sentence structure, mannerisms
- Sets the scene — where are we, what's happening, what does the environment feel like
- Creates a hook — gives the user something to respond to, a reason to engage
- Demonstrates the desired format — if you want third-person narration with dialogue, show it here
Example
*The tavern door creaks open, letting in a gust of rain-soaked wind.
A figure steps inside — tall, cloaked, water dripping from leather
boots onto the warped floorboards. She pushes back her hood to reveal
sharp features and pale eyes that sweep the room with practiced
efficiency.*

*Her gaze lands on you.*

"You are the one who posted the notice." *It is not a question. She
pulls a crumpled piece of parchment from her belt — your job listing,
rain-smudged but legible.* "I will hear the details. But first —"
*she drops into the chair across from you without asking* "— tell me
why no one else has taken it."
This first message establishes third-person narration style, shows the character's personality (direct, observant, no-nonsense), sets a scene, and ends with a question that invites the user to respond.
Alternate Greetings
Characters can have multiple first messages. Each one offers a different starting scenario or tone:
- A casual coffeeshop meeting vs. a dramatic battlefield encounter
- The character in a good mood vs. suspicious and hostile
- Different points in a timeline (first meeting vs. reunion after years)
When starting a new chat, you can pick which greeting to use. Each alternate greeting can have an optional title to describe what scenario it sets up. Alternate greetings cost nothing per turn — they're just additional opening scenes the user can choose from.
Example Dialogue
Example dialogues teach the AI how the character speaks and interacts. They're the most direct way to shape voice, pacing, and behavior.
Format
Example dialogues use a simple format with name prefixes:
{{user}}: What happened to your arm?
{{char}}: *She glances down at the mechanical limb, flexing copper
fingers.* "An occupational hazard. The creature that took it no longer
has a head, so I consider it a fair trade." *A faint smile crosses her
face — the kind that doesn't reach her eyes.*

{{user}}: Can you teach me to fight?
{{char}}: *She studies you for a long moment, expression unreadable.*
"No." *She pauses.* "But I can teach you to survive. Fighting is what
fools do when surviving was not enough."
Tips
- Show speech patterns consistently. If the character uses formal language, every example should reflect that.
- Include action/narration. If you want the AI to write actions between dialogue (asterisk formatting), demonstrate it here.
- Cover different emotional states. Show the character being happy, angry, sad, and neutral. The AI needs examples of range.
- Quality over quantity. Three well-crafted exchanges teach more than ten generic ones.
The Casting Card
The Casting Card is the character's structured identity strip — like a headshot-and-bio for an actor. It collects the surface-level details that show up on the character's profile page and in the Casting Call picker, and it controls the visual chrome that themes the whole card.
Identity Fields
| Field | Description |
|---|---|
| Stage Name | The character's display name. Same value referenced by {{char}}. |
| Full Name | Legal or birth name. Can differ from the stage name (e.g. for characters who use aliases). |
| Title / Epithet | Occupation, rank, or honorific — "The Magnificent," "Captain of the Guard," "Lord of Thorns." |
| Age | A free-form string. "Ancient," "25," "Timeless," "Looks 19" — anything fits. |
| Pronouns | Free-form. Drives the {{they}}, {{them}}, {{their}} macros if your preset uses them. |
| Tagline | One-liner that appears on Discovery cards and the casting card itself. |
The Casting Card identity fields are user-facing reference data. They aren't injected into the AI prompt directly unless your preset specifically pulls from them — for prompt-level identity, write it into the Description.
Visual Chrome
Every character has a theme color and a gradient strip that show up on the casting card, in Discovery, and as the accent color for the character panel.
| Control | What It Does |
|---|---|
| Signature Colors (Theme) | Up to three hex colors that blend into the character's gradient. One color = solid; two or three = gradient. Drives the panel accent and the casting card's color stripe. |
| Named Colors | A free-form palette of labeled colors (Hair, Eyes, Skin by default — you can add more). These get exported as XML tags the AI can reference, so the character's appearance details stay consistent across chats. |
The Theme gradient is purely visual — it doesn't affect AI behavior. The Named Colors palette, by contrast, gets serialized into the prompt as structured tags (<hair>Silver</hair>, <eyes>Indigo</eyes>, etc.) so the AI can use them.
Casting Card Image
Every character has a primary portrait image. You can upload from your device or paste a hosted URL. The image:
- Fills the left side of the character panel on desktop
- Becomes the background for the Discovery card
- Is embedded into PNG exports as the card's actual image
- Has a "Now Playing" pill overlay when the panel is open in a chat
If no image is uploaded, the panel falls back to a placeholder silhouette.
Alternate Arts (Variants)
A single character can have multiple Alternate Art variants — different visual presentations or personality variations of the same character. Variants appear as a row of small thumbnails along the bottom of the character image in the panel, and the user can swap between them mid-chat.
Each variant can override any combination of the parent character's fields:
- Different image and thumbnail
- Different name or tagline
- Modified description, personality, or scenario
- Unique first message and example dialogues
- Its own system prompt and post-history instructions
Variants can be set to mirror the base character (empty fields inherit from the parent) or to diverge (empty fields override the parent with empty values). Mirror mode is the default and is what most creators want — it lets you make a variant that only changes the image and first message while keeping everything else.
When you switch a variant mid-chat, the panel briefly flashes "Variant Applied" so the swap is visible. The active variant is remembered per-chat, so different chats with the same character can show different variants.
Use Cases
- Outfit variants — Same character, different look (casual, formal, battle gear)
- Timeline variants — The character at different points in their story (young, present day, future)
- AU variants — Alternate universe versions (modern AU, fantasy AU, sci-fi AU)
- Mood variants — Same character in different emotional states or relationship stages
Variants have their own tags and can be tagged with intensity values just like the parent character. They show up in Discovery indirectly through the parent's listing.
Tags & Content Rating
Tags
Tags categorize your character for Discovery browsing and filtering. They're managed through the Tagsheet wizard — a multi-step picker that walks you through every relevant tag category for a character (card type, gender, species, personality, archetype, setting, genre, mood, kink).
The Tagsheet enforces a few rules:
- Card type (Character / Narrator / Setting / Game Master) is single-select.
- Gender has card-type-specific constraints (e.g. some card types require exactly one gender, others allow multiple).
- Setting context (Original Character / Alternate Universe / Fandom) is a follow-up step that only appears for Setting cards.
- Fandom tagging is its own step — characters from existing media get linked to a Fandom entity for cross-referencing.
Each tag carries an intensity level that describes how prominent that trait is:
| Intensity | Meaning | Example |
|---|---|---|
| 1 — Subtle | Present but not a focus | A warrior character with "romance" intensity 1 |
| 2 — Moderate | A notable element | A romance-focused character with "romance" intensity 2 |
| 3 — Prominent | A defining feature | A pure romance character with "romance" intensity 3 |
Tag intensity helps users find exactly what they're looking for — someone browsing for heavy action won't be surprised by a character where combat is only a background element.
Content Rating
Every character has a content rating that controls where it appears and what trigger warnings are required:
| Rating | Description |
|---|---|
| All Hours | Suitable for general audiences. No explicit content. |
| Late Night | Mature themes — violence, dark topics, suggestive content. |
| After Dark | Explicit adult content. |
Trigger warnings are selected from a curated list inside the Tagsheet wizard and have their own severity scale (Mild, Moderate, Severe).
The content rating is owner-only. Non-owners who edit a character locally (via overrides) can't change the rating of the original.
Linked Lorebooks
A character can have one or more bundled lorebooks — world info packs the creator recommends as "the setup that goes with this character." Bundled lorebooks appear in a dedicated section of the character panel with a "Creator Recommends" badge and a star.
When you start a chat with a character that has bundled lorebooks:
- Each bundle gets a first-time prompt with thumbs-up / thumbs-down buttons. You decide once per lorebook whether to enable it.
- Once you've made a choice, the bundle switches to a toggle you can flip on/off any time without prompting again.
- The decision sticks per-chat, so different chats with the same character can have different lorebook sets active.
Each bundled lorebook entry shows its name, optional description, optional creator note, entry count, and an approximate token count.
Adding Your Own Lorebooks
Below the bundled section, you can attach your own lorebooks to the chat session even if the creator didn't bundle them. These show under "Your Added Lorebooks" with their own toggle and remove button. User-added lorebooks are session-scoped — they don't get saved onto the character itself.
Linked Personas
Characters don't pin a default persona — RoleCall keeps persona selection separate so the same character works with any persona you want. Personas are picked via the Casting Call picker (the persona-side equivalent of the character panel), which sits alongside the character panel in the wing chrome.
Bundled Lorebooks
A character can bundle one or more lorebooks. When someone starts a scene with that character, the bundled lorebooks auto-attach to the session — no manual setup required on the user's end.
Bundling is the right pattern when your character comes from a world with lore that the AI needs in order to play them well. Rather than cramming that lore into the character description, you keep the description lean and let a bundled lorebook handle the worldbuilding. The lorebook activates only the relevant entries as the conversation touches on their topics.
Where to Bundle
Open the character's full editor and go to the Lorebooks tab. From there, drag lorebooks from your Library into the bundle slot, or use the search picker to find lorebooks by name.
Each bundled lorebook has an activation toggle:
| Setting | Behavior |
|---|---|
| Active on start | The lorebook is enabled automatically when a new scene begins. The user sees it in their active lorebook list and can disable it, but it's on by default. |
| Requires user toggle | The lorebook ships with the bundle but is off by default. A first-time prompt asks the user whether to enable it. |
The distinction matters for large lorebooks — a 500-entry world lorebook might be exactly what some users want and overkill for others. Setting it to "requires user toggle" surfaces it clearly without forcing it on everyone.
Lorebook Order
Bundled lorebooks are activated in the order shown in the editor. Within a chat session that has multiple lorebooks active, entries from all lorebooks are processed together — but when two entries from different lorebooks match the same keyword at the same priority, lorebook order can be a tiebreaker. Put the most essential lorebook first.
Forks and Attribution
When a user forks your character (Rewrite), the bundled lorebooks come along. The fork inherits:
- The same lorebook list
- The same activation toggle states
- Full lineage attribution for any lorebooks that were themselves forked from other creators
Cross-creator bundling is fine — you can bundle a lorebook you forked from another creator, and the fork chain for that lorebook is preserved. The character's fork count and the lorebook's fork count are tracked independently.
Bundled lorebooks are subject to Fork Rules — if a creator has set restrictions on how their character can be forked, those rules apply to the bundle as a whole.
Per-Scene Detach
Users can detach a bundled lorebook from a specific scene without modifying the character itself. In the Lorebook wing panel inside a chat, they can remove a bundled lorebook from the active list for that session. The character remains bundled — if they start a new scene with the same character, the lorebook will be offered again.
This is useful for power users who want to swap out the bundled world lorebook for their own version, or who are running a specific scenario that the bundled lore would clash with.
Tips
- Bundle world-info lorebooks for fantasy, sci-fi, or historical characters that live in a specific setting. The character card stays focused on personality; the lorebook handles geography, factions, and history.
- Bundle NPC-list lorebooks for characters that are part of a cast — a lorebook that defines the other characters in the world makes ensemble writing more consistent.
- Bundle glossary lorebooks for jargon-heavy settings — technical systems, unique vocabulary, made-up languages. These activate exactly when the relevant terms appear.
- Keep bundles to 1-3 lorebooks. More than that can slow the trigger engine and overwhelm the AI's context window. If you need more, consolidate related entries into fewer, better-organized lorebooks.
See the Lorebooks doc for details on how lorebook triggers and token budgets work, and for the creator-side view of what it means to have your lorebook bundled to a character.
Linked Regex Scripts
Characters can ship with embedded regex scripts — text-processing rules that run on messages as they're streamed or after they're complete. Use cases include reformatting AI output, auto-censoring specific phrases, or normalizing dialogue tags. Regex scripts attached to a character become recommendations the user can accept or skip when they start a chat.
Character Panel — Every Action
The Character Panel is the wing that opens whenever you click the character's image during a chat. It's a full editor — every field, every control, every action, all in one scroll.
Top Bar
| Control | What It Does |
|---|---|
| Eyebrow text | Shows "Edit character" by default, or "Viewing original" when you're previewing the upstream version. |
| Compare button | Opens the side-by-side Diff Modal. Only appears when you have personal overrides on someone else's character. |
| View Your Fork / View Original toggle | Flips between your personalized version and the unmodified original. Only appears when you have overrides. |
| Close (X) | Closes the panel. |
Image & Variants
- Click the image (or the camera icon) to upload a new portrait.
- A row of thumbnails along the bottom shows alternate art variants (if any). The leftmost thumbnail is the original art; the rest are variants.
- Click any thumbnail to swap to that variant mid-chat. The save button flashes "Variant Applied" to confirm the swap.
Casting Card
The top section of the panel contains the Casting Card with Stage Name, Full Name, Title/Epithet, Age, Pronouns, and Tagline fields.
Color Palette
Two color controls sit just below the Casting Card:
- Signature Colors (Theme) — Pick 1–3 hex colors. Drives the entire panel's accent and the casting card's gradient.
- Named Colors — A list of labeled hex colors (Hair, Eyes, Skin by default; add more by clicking +). These export as XML tags into the AI prompt.
Prose Fields
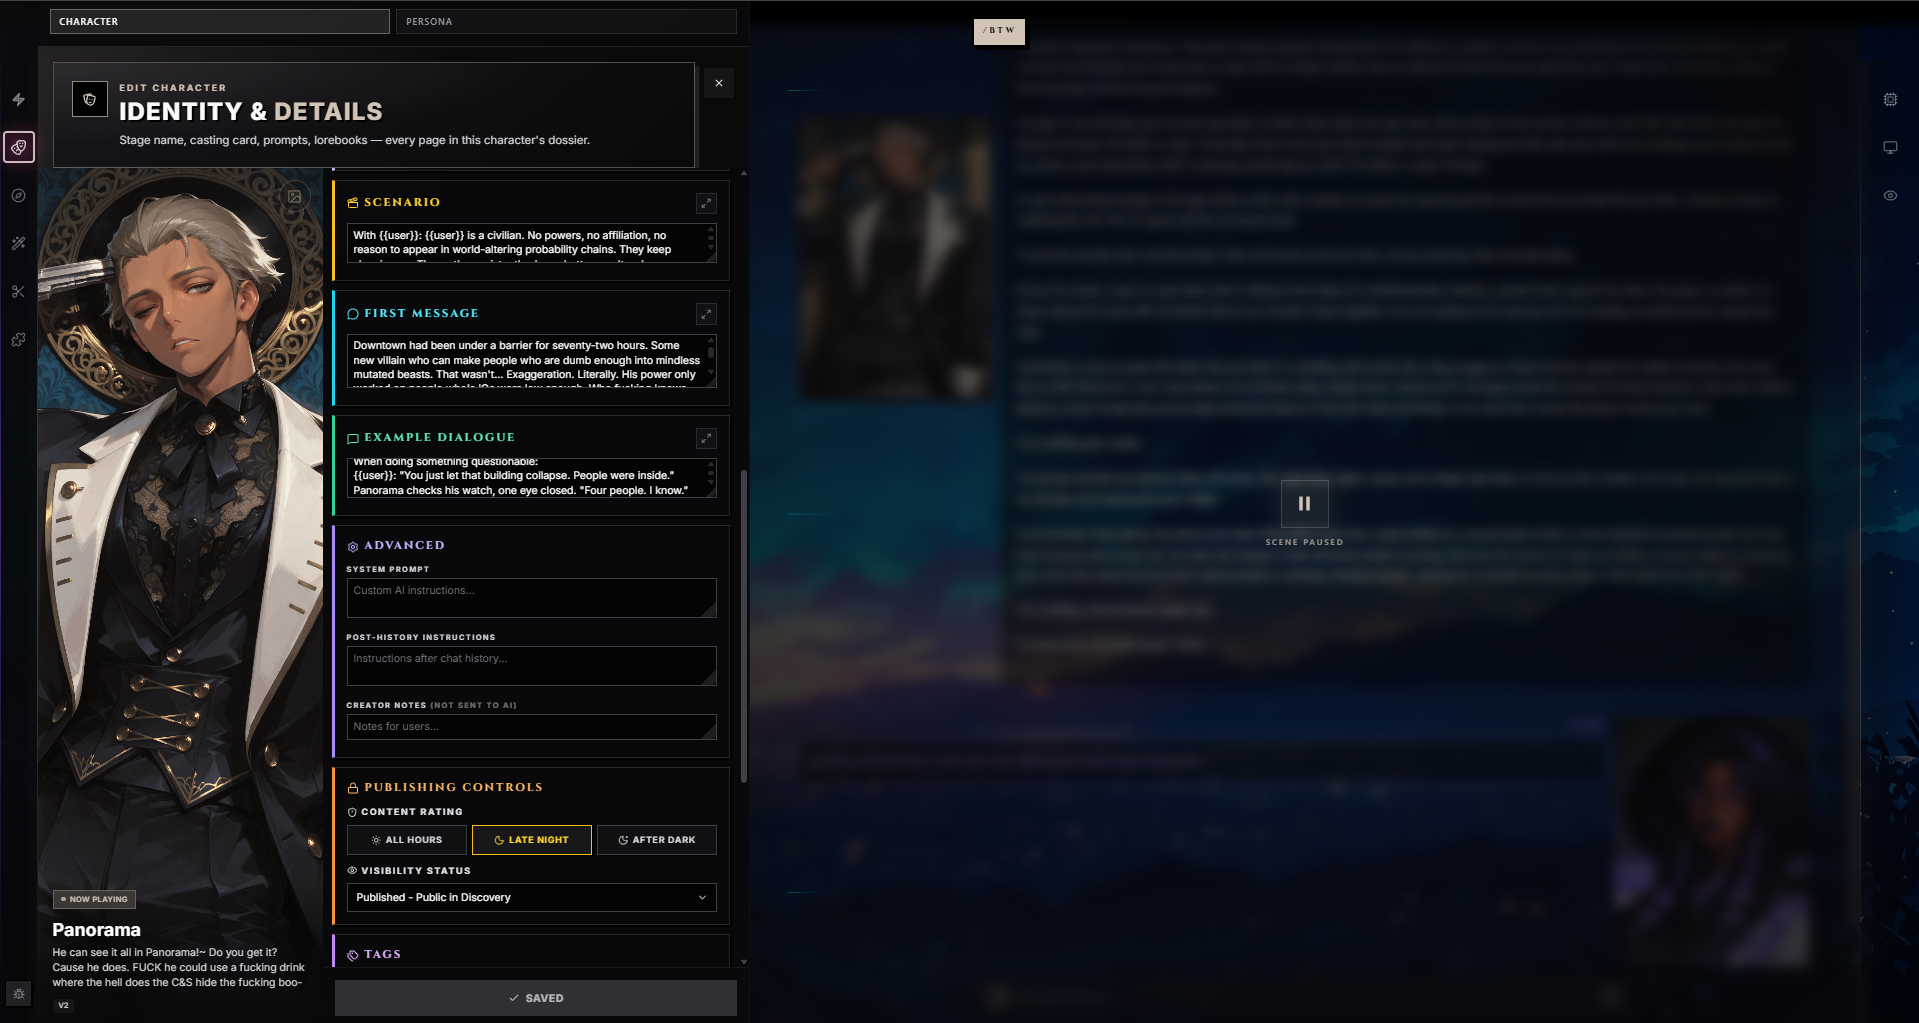
Five prose textareas, each with an Expand button that opens it fullscreen for distraction-free editing:
| Section | Purpose |
|---|---|
| Description | The main character body. |
| Personality | Focused traits and behavior summary. |
| Scenario | Default opening scene. |
| First Message | The character's first response when a chat begins. |
| Example Dialogue | Sample exchanges showing voice and style. |
Press Esc to close any expanded field.
Advanced Section
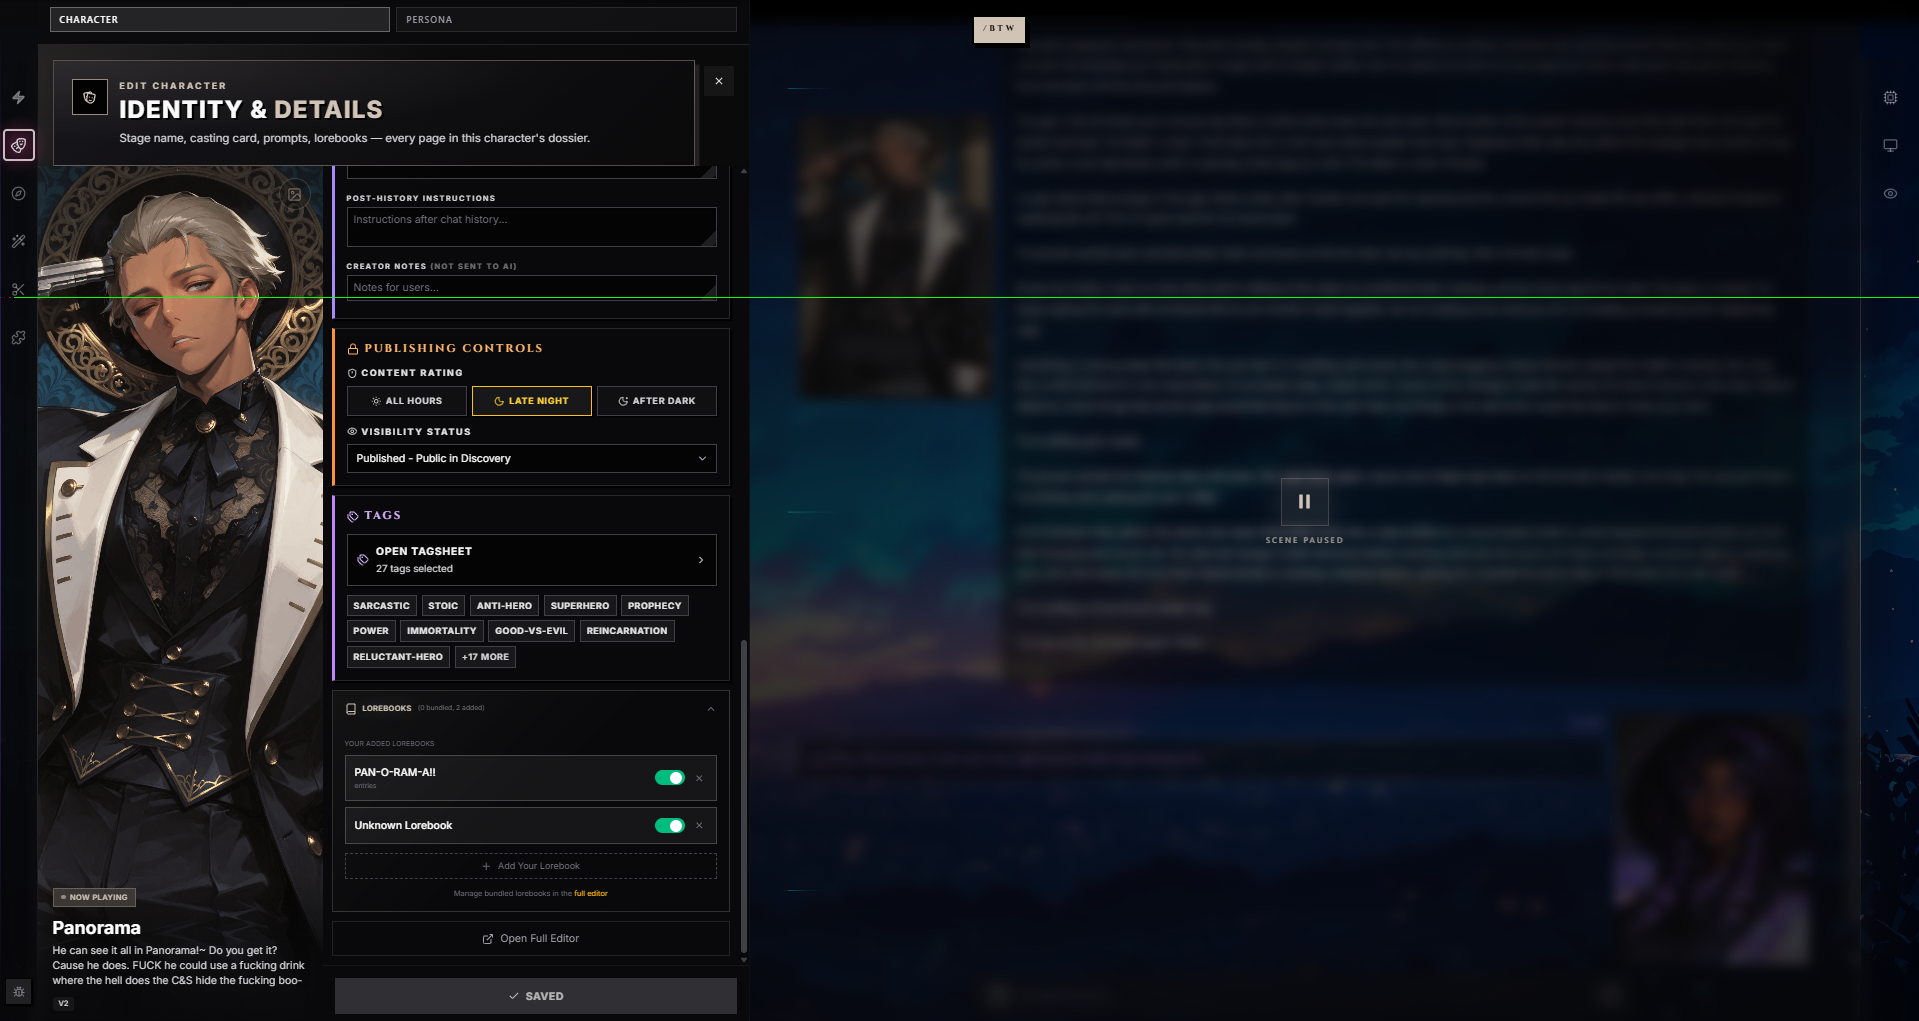
| Field | Purpose |
|---|---|
| System Prompt | Character-specific system instructions, replaces or augments the preset's main prompt. |
| Post-History Instructions | Text injected after the chat history (jailbreak-style position). |
| Creator Notes | Notes for other creators and users. Not sent to the AI. |
Publishing Controls (Owners Only)
Owners see a Publishing Controls section with two dials:
- Content Rating — All Hours / Late Night / After Dark.
- Visibility Status — Draft / Private / Published / Unlisted / Removed.
Non-owners don't see these — the character's rating and visibility are controlled by the original creator.
Tags (Owners Only)
A single button — Open Tagsheet — launches the full Tagsheet wizard for managing tags, trigger warnings, and fandom associations. The count of currently selected tags is shown inline ("12 tags selected"). Up to 10 selected tags are previewed as chips below the button.
Lorebooks Section
The bundled-lorebooks UI described above sits here, with creator-recommended bundles, user-added lorebooks, and an "Add Your Lorebook" dropdown for attaching lorebooks from your library.
Footer Buttons
| Button | Visible To | What It Does |
|---|---|---|
| Save Draft | Owners | Persists pending edits to the base character. Everyone using the card sees the change. |
| Save Override | Non-owners | Persists pending edits as a per-chat override. The original card is untouched; only your version changes. |
| Saved | Everyone (no-op) | Indicates no pending changes. |
| Rewrite Character | Non-owners | Creates a permanent copy (fork) of the character in your library with your local edits baked in. |
| Publish Draft to Everyone | Owners with overrides | Pushes your draft overrides up to the base character so all viewers see the new version. |
Saves are also bound to Ctrl+S / Cmd+S.
Open Full Editor
A link at the bottom opens the character's full edit page in a new tab. The full editor exposes everything the wing panel does plus the long-tail features — alt-art management, content version history, bundle management, rollback, fans/repertoire admin, etc.
The Diff Modal (Compare & Edit)
When you have personal overrides on someone else's character, the Compare button opens a side-by-side modal:
- Left column — The original character (read-only, dimmed). Changed fields are tinted red and labeled "Changed."
- Right column — Your fork (editable). Changed fields are tinted green and labeled "Modified."
The header shows how many fields are different. The footer reminds you that "Your changes are saved as personal customizations." Press Esc or click the X to close.
You can edit any field directly in the modal — your edits route through the same auto-save path as the main panel.
Publishing Lifecycle
On mobile, Tools → Grid / Steps switches the layout without discarding edits. Save and Start scene stay in the header. Tools contains publication status, Playbill, import/export, direct setup shortcuts, Note for AI, Variables, content rating and detailed tips. There is no intermediate Advanced setup menu. In Grid, expand Portrait, artwork & variants to reach the artwork and variant controls; in Steps the character details come before the portrait. Selecting a setup check closes Tools and takes you to the relevant editor section.
The mobile header keeps Start scene visible; Grid / Steps is inside Tools. Save is a compact32px icon beside the character name: a save symbol and dot for unsaved edits, a spinner while saving, and a check when saved. Mobile Editor/Playbill navigation is inside Tools; desktop retains its tab selector. Library is explicitly labeled in Tools. Tools shares the lower action row with Start scene, using equal-width, matching 34px-high outlined controls. The four-step navigation strip is desktop-only; mobile users can jump to Casting, Prompts, Advanced or Finalize through Tools → Editor section, or use the existing Back / Next controls within Steps. For saved characters, publication status is in Tools on mobile and at the right of the Editor / Playbill tab row on desktop. Status-change behavior is unchanged. Mobile Playbill also provides a Library / Editor / Playbill breadcrumb. Returning to Editor keeps the in-memory booklet draft; leaving for Library uses the existing browser unsaved-change warning.
RoleCall's encryption recovery prompt can be deferred with Do this later. This does not unlock encrypted features or reset keys. The character editor stays usable without a persistent recovery banner; resume encryption from Settings.
Saving character edits and changing publication status are separate actions. Save retains your edits without publishing the character. Clearing optional identity fields such as Name, Title, Age, or Pronouns removes their saved values. The Draft / Private / Published control changes availability. Draft and Private update the status badge only after the change saves; if saving fails, the previous status remains and an error explains that you can retry.
Characters move through a small set of status states. The state controls who can see the character and where it appears.
| Status | Who Can See It | Appears in Discovery |
|---|---|---|
| Draft | Only you | No |
| Private | Only you | No |
| Published | Everyone | Yes |
| Unlisted | Anyone with the link | No |
| Removed | Only you (read-only in library) | No |
| Deleted | People who already have a chat with it or saved it | No |
draft and private look the same to outside users (invisible) — the distinction is that draft marks "this is still a work-in-progress for me," while private marks "this is done but I don't want it public." Published characters get a published_at timestamp.
Publishing and edits to published characters run an automated safety check. A confirmed policy rejection blocks the change with an explanation. If the reviewer service is unavailable, saving and publishing may continue without an approval verdict, and the server emits an operational alert. This does not bypass ownership checks or failed content loads. The separate audience-tier manual submission queue is disabled by default; automated review does not put every publication into pending_review.
Deleted characters leave Plotlight and the creator's library, but the data is kept. Anyone who already has a chat with the character, or has it in their Repertoire, can still open those chats and keep playing, and their personal overrides for it still save. Nobody else can find or open it. The same holds when a creator unpublishes a card back to draft or private.
Removed characters (a moderation action) are hidden from everyone except the creator, including inside existing chats, until a moderator restores them.
Publishing Requirements
To move a character to Published, you must:
- Have a Stage Name set
- Have the required tag categories filled in (the Tagsheet wizard tells you which ones are missing)
Unpublishing
You can flip a published character back to Private at any time. The character disappears from Discovery immediately, but anyone who already forked it keeps their copy.
Forking & Lineage
Forking (called Rewrite in the UI) creates your own copy of a character — your own to edit, publish, and share.
How It Works
- Find a character you like on Discovery, or open one of your own characters.
- Click Rewrite Character in the panel footer (non-owners) — a copy appears in your library as a draft.
- Customize anything: name, description, personality, scenario, images.
- Optionally include specific alternate arts from the original.
If the source character has fork rules attached (terms the original creator wants you to accept before forking), you'll see a fork rules acceptance modal before the copy is created.
Attribution & Lineage
Forked characters preserve full lineage on the new copy:
- forked_from_id — Direct parent character.
- original_creator_id — The creator at the very top of the fork chain.
- original_character_name — Name at the time of fork (so renames don't break attribution).
- forked_at — Timestamp.
The original character's fork count increments as social proof. Attribution stays attached to your fork even if the original is deleted or made private later.
Variants vs. Forks vs. Overrides
| Action | What It's Called | Where It Lives |
|---|---|---|
| Copy someone else's published character | Fork (Rewrite) | New character in your library, with lineage |
| Copy your own character | Variant | Either a new character (full fork) or an alt-art on the existing one |
| Make personal edits without copying | Override | Per-chat, stored against the original; original is untouched |
Overrides are the lightest option — they let you tweak a character "just for this chat" without making a permanent copy. The original creator's version stays the canonical one for everyone else.
Checking for Upstream Updates
If the character you forked gets updated by its original creator, you can pull a diff and selectively pick which fields to sync into your fork. You choose which changes to accept — it's cherry-picking, not auto-merging. Synced fields update a per-fork snapshot so you can see what's drifted since you last pulled.
Repertoire (Subscribe Without Forking)
If you don't want a permanent copy but you do want quick access to a character, add it to your Repertoire. Repertoire is your personal shelf of characters you've subscribed to — like favoriting, but with version tracking:
- Repertoire entries can auto-update when the original creator publishes new content, or stay pinned to a specific snapshot.
- Subscribed characters show up in your Casting Call picker alongside characters you own.
- Removing from Repertoire doesn't touch the original; it just unsubscribes you.
Repertoire is the right answer when you want to use a character without forking — no lineage created, no edits saved, just easy access.
Import & Export
Importing Characters
RoleCall can import characters from other platforms. Imported characters arrive as drafts in your library (or private if you choose).
| Format | How |
|---|---|
| PNG (SillyTavern card V2 or V3) | Upload a character card PNG — the character data is embedded in image metadata. |
| JSON (Character Card V2) | Upload a standard Character Card V2 JSON file. |
| JSON (Character Card V3) | Upload a V3 format JSON file with extended fields. |
| JSON (Legacy V1 / TavernAI) | Older single-file character JSON. |
| rolecall_character | RoleCall's native export format — preserves every RoleCall extension. |
If the imported file contains an embedded lorebook (V2 character_book or V3 character_books), it's detected and offered for import alongside the character. If the import file references RoleCall extensions (intensity tags, alternate arts, recommended content), those are preserved as well.
SillyTavern's slightly-different field naming and embedded metadata is normalized on the way in — you don't have to know which spec version the file was authored against.
Exporting Characters
Export your characters in multiple formats for use in other tools:
| Format | Description |
|---|---|
| JSON (V2) | Character Card V2 JSON — the universal standard. |
| JSON (V3) | Character Card V3 JSON — newer format with extended fields. |
| PNG (V2) | V2 card embedded in a PNG image — works with SillyTavern, Risu, JanitorAI imports. |
| PNG (V3) | V3 card dual-embedded in PNG (both V3 and V2 chunks for backward compatibility). |
| Backyard | Backyard.ai / Faraday-compatible JSON. |
Export Options
When exporting, you can choose:
- Include RoleCall extensions — Embeds recommended presets, lorebooks, personas, and regex scripts in the export under an extensions block. Other RoleCall users who import the file get the full setup. Other tools ignore the extension block harmlessly.
- Merge lorebooks — If the character has multiple linked lorebooks, merges them into a single
character_bookfield for compatibility with tools that only support one embedded lorebook. If unchecked, multiple lorebooks export as acharacter_booksarray (a RoleCall extension that not all platforms understand).
Round-Trip Compatibility
Characters imported from SillyTavern can be exported back to SillyTavern format without data loss on standard fields. RoleCall-specific features (intensity tags, alternate arts, bundled lorebooks, the Casting Card details, content rating, named-color palette) are preserved in the RoleCall extensions block and survive a round-trip between RoleCall users, but won't be visible in other tools.
Unauthenticated visitors can also export public characters that have been marked exportable by the creator. Export rate-limits apply for unauthenticated users to discourage bulk scraping.
Group Chats
Characters can participate in group chats with multiple AI characters in the same conversation. Adding characters to a group uses the same Casting Call-themed picker as personas:
- Add multiple characters to a single chat
- Each character maintains their own personality and voice
- Characters can be reordered to control speaking sequence
- Optionally assign a group-specific preset that overrides each character's solo preset
Group chats are useful for ensemble scenes — a party of adventurers, a council meeting, a classroom full of students — where multiple AI personalities need to interact with each other and with you.
Featured Character (Portfolio Pinning)
Your Plot portfolio (the public creator page at plotlightstudios.com/portfolio/yourname) can showcase a "Featured Character" block. The block can be configured to:
| Display Mode | Behavior |
|---|---|
| Latest | Auto-selects your most recently published character. |
| Popular | Auto-selects the character with the most likes/chats. |
| Pinned | Pins a specific character by ID — you choose. |
| Random | Randomly rotates from your published characters. |
The featured block can optionally show the "CHARACTERS" category badge, a data-source hint, the publish date, and the comment count — all configurable.
Discovery & Sharing
Published characters appear on the Discovery page where other users can find them.
How Discovery Works
- Characters are searchable by name, tagline, description, and personality
- Filter by tags, intensity, genre, fandom, and content rating
- Sort by rating, chat count, favorites, or recency
- Featured characters are highlighted by staff curation
Social Metrics
Your character's page shows engagement metrics:
| Metric | What It Tracks |
|---|---|
| Rating | Average user rating (with optional written reviews) |
| Favorites | How many users have favorited the character |
| Chats | How many chat sessions have been started with this character |
| Forks | How many users have forked the character (called "Rewrites" in the UI) |
| Messages | Total messages exchanged across all chats with this character |
These metrics help users find popular, well-received characters and serve as social proof for your work as a creator.
The character panel's sidebar satellites show two of these at a glance during a chat: a Token Usage card with the live token count per field, and a Created By card with the original creator's avatar and a link to their portfolio.
Macros in Characters
Character card fields support the full macro system. Macros are resolved at runtime, so they always reflect current values.
Essential Character Macros
{{char}} — The character's name (always use this instead of hardcoding)
{{user}} — The user's display name
{{persona}} — The user's persona description
Pronoun Macros
If you set pronouns in the Casting Card, pronoun macros resolve automatically:
{{they}} looked up as {{user}} entered the room.
"This is {{their}} domain," {{they}} said, crossing {{their}} arms.
Resolves to "She looked up..." or "He looked up..." or "They looked up..." depending on the character's pronoun setting.
Dynamic Content
*{{char}} checks the time.* "It is {{time}}, and we have much to discuss."
{{char}} has been waiting for {{idle_duration}}.
The {{weather}} weather made {{them}} pull {{their}} cloak tighter.
Variables in Characters
Character descriptions can read and set variables for stateful interactions:
{{char}}'s trust in {{user}}: {{getvar::trust}} / 100
Current mood: {{mood}}
See the Macros guide for the complete macro reference.
Tips & Best Practices
Invest in the first message. It's the single biggest influence on conversation quality. The AI will mimic its length, format, style, and tone for every subsequent response.
Use example dialogue to show, not tell. Saying "Elena speaks formally" in the description is less effective than three examples of Elena speaking formally.
Keep descriptions under 1,500 tokens. Longer isn't better — it dilutes the signal. Focus on what makes this character unique and how they behave in conversation. The token-usage satellite in the panel shows you exactly how much each field costs.
Test with different presets. A character that works brilliantly with one preset may fall flat with another. Note which presets work best in your creator notes.
Tag honestly. Accurate tags, intensity values, and content ratings build trust with your audience. Mislabeled content gets reported, and the Tagsheet wizard makes the right tags easy to find.
Use alternate greetings generously. They're free (no extra tokens per turn) and give users variety. A character with five greetings across different scenarios is more engaging than one with a single opening.
Use overrides before forking. If you only want to tweak someone else's character for your own chats, save personal overrides — no permanent copy, no clutter in your library, original creator's metrics stay accurate. Fork (Rewrite) only when you want to publish your changes or alter the character permanently.
Leverage bundled lorebooks for deep lore. Don't cram your entire world into the character description. Put foundational character info in the card, and supplementary world-building into a bundled lorebook. This keeps the character lean while the lorebook activates only the relevant context.
Set the Named Colors palette. It's a small lift but it pays off — the AI gets consistent appearance details every turn without you having to repeat them in prose.
Pick your Theme gradient deliberately. It colors the entire panel and the Discovery card. A theme that matches your character's vibe (cold blues for a stoic warrior, warm oranges for a hearth-keeper) does a lot of subliminal work.